Ford F150 Code P1131 And P1151: Solve It Yourself!
Engine codes are there to let you know if your vehicle is having any problems or not. That’s why multiple errors code may also appear. Today, we will shed some light on error codes P1131 and P1151 in a Ford F150.
So, what do the Ford F150 codes P1131 and P1151 mean?
P1131 code says “Insufficient Switching O2 Bank 1 Sensor 1 Sensor/Lean” and P1151 says, “Insufficient Switching O2 Bank 2 Sensor 1 Sensor/Lean”. As a result, the O2 sensors don’t switch between rich and lean conditions as much as they should. The engine may run hotter than usual because there is not enough fuel in the air/fuel mixture.
There are a variety of reasons for this, including vacuum leaks, faulty O2 sensors, clogged fuel injectors, etc. Now that you know what the codes mean, let’s see how to solve the problem.
Is the Ford F150 Code P1131 and P1151 Serious?
Trouble codes P1131 and P1151 for a Ford F150 do not mean anything fatal. Yet, you should not ignore these codes as they can cause poor engine performance and fuel efficiency.

They indicate a problem with the oxygen sensors, which monitor oxygen levels and provide feedback to the ECM to adjust the air/fuel mixture. When the O2 sensors are not functioning properly, it leads to poor engine performance and fuel efficiency.
Therefore, it is important to have the root cause of these codes diagnosed and repaired as soon as possible.
Ford F150 Code P1131 and P1151: 7 Reasons and Solutions
With all the basics out of the way, let’s talk about all the reasons for triggering these codes and how to solve them.
| Reasons | Symptoms | Solution |
| Faulty O2 Sensors can cause Ford F150 Code P1131 and P1151 | Check Engine Light. Decreased fuel economy. Rough idling or stalling. Engine misfires or runs poorly. Reduced acceleration or power. Increased emissions or failed emissions test. Higher fuel consumption. Unusual exhaust odor or color. Difficulty starting the engine. | Replace the O2 sensor to solve the Ford F150 Code P1131 and P1151 |
| Dirty MAF Sensor | Check Engine Light Engine misfires Rough idling Stalling Reduced power and acceleration Hesitation during acceleration Poor fuel efficiency | Clean the MAF sensor |
| Vacuum Leaks | Check Engine Light Rough idling Stalling Hesitation or stumbling during acceleration Decreased power or performance Increased fuel consumption The vacuum gauge reading is low or fluctuating, Whistling or hissing noise from under the hood | Repair the leak or replace leaky component |
| Clogged EGR Valve | Check Engine Light Rough idle Engine hesitation or stumbling Decreased fuel efficiency Increased emissions | Clean the EGR valve |
| Faulty IAT Sensor | Check Engine Light Rough idling or stalling Decreased fuel efficiency Engine hesitation or surging Black smoke from the exhaust Engine knocking or pinging Difficulty starting the engine Poor engine performance and acceleration | Replace the IAT sensor |
| Faulty Spark Plug | Check Engine Light Engine misfires or runs poorly. Difficulty starting the engine. Decreased fuel economy. Rough idling or stalling. Engine surging. Reduced acceleration. Increased emissions | Clean or replace the spark plug |
| Faulty Fuel Injector or Clogged Fuel Filter | Check engine light. Poor acceleration Difficulty starting the engine Engine misfires Reduced fuel efficiency A strong smell of gasoline when driving or idling. Engine hesitation Reduced performance Engine making sounds. | Clean the fuel injectors or replace the fuel filters to solve the Ford F150 Code P1131 and P1151 |
Reason One: Faulty O2 Sensors
Faulty O2 sensors could be the root cause of the problem. That’s because the codes point directly to them.
Symptoms:
- Check Engine Light.
- Decreased fuel economy.
- Rough idling or stalling.
- Engine misfires or runs poorly.
- Reduced acceleration or power.
- Increased emissions or failed emissions test.
- Higher fuel consumption.
- Unusual exhaust odor or color.
- Difficulty starting the engine.
Diagnosis:
There are four total O2 sensors in your Ford F150, these codes indicate a problem with two of them: bank 1 sensor 1 and bank 2 sensor 1.
First, you will have to locate both of these sensors. The Bank 1 Sensor 1 and Bank 2 Sensor 1 on a Ford F150 is typically located on the exhaust system, before the catalytic converters.
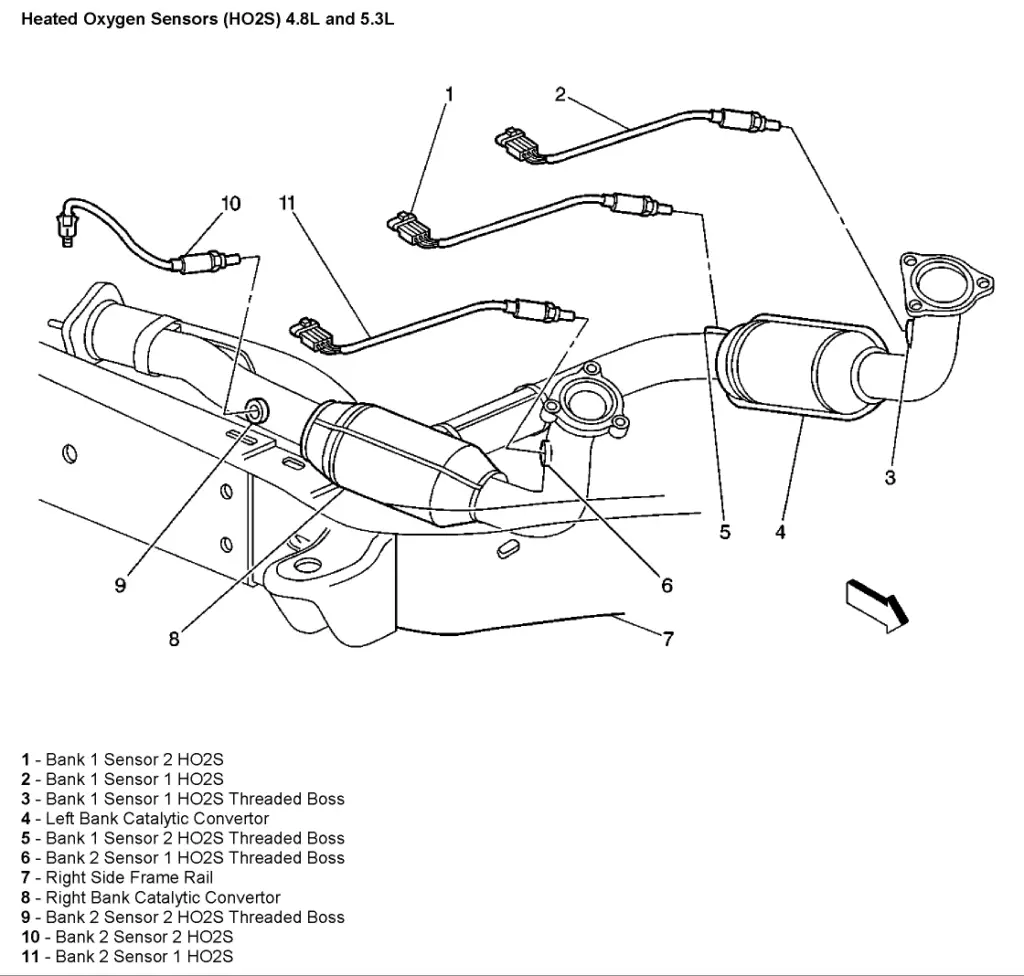
For the F150 with a 4.6L or 5.4L engine, Bank 1 Sensor 1 is located on the driver’s side, and Bank 2 Sensor 1 is located on the passenger’s side of the exhaust manifold.
For the F150 with a 3.5L engine, Bank 1 Sensor 1 is located on the passenger’s side, and Bank 2 Sensor 1 is located on the driver’s side of the exhaust manifold.
To test an oxygen sensor using a multimeter, first, locate them. Then warm up the vehicle for 5-20 minutes to get it to operating temperature. After that, disconnect the sensors’ wiring harness.
Connect two wires to the signal and the ground wire of the sensor. Using the multimeter, connect the probes to the wires that were attached to the sensor. Set the multimeter to 20 volts and observe the reading. The meter should give you a reading between 0.1-1 volt.
If the voltage is not in the recommended range, that means the sensor is not sending a signal to the ECU. This means the O2 sensors are at fault.
Solution:
The O2 sensor on your Ford F150 needs to be replaced if it is not working properly. Watch the video below to learn how.
Reason Two: Dirty MAF Sensor
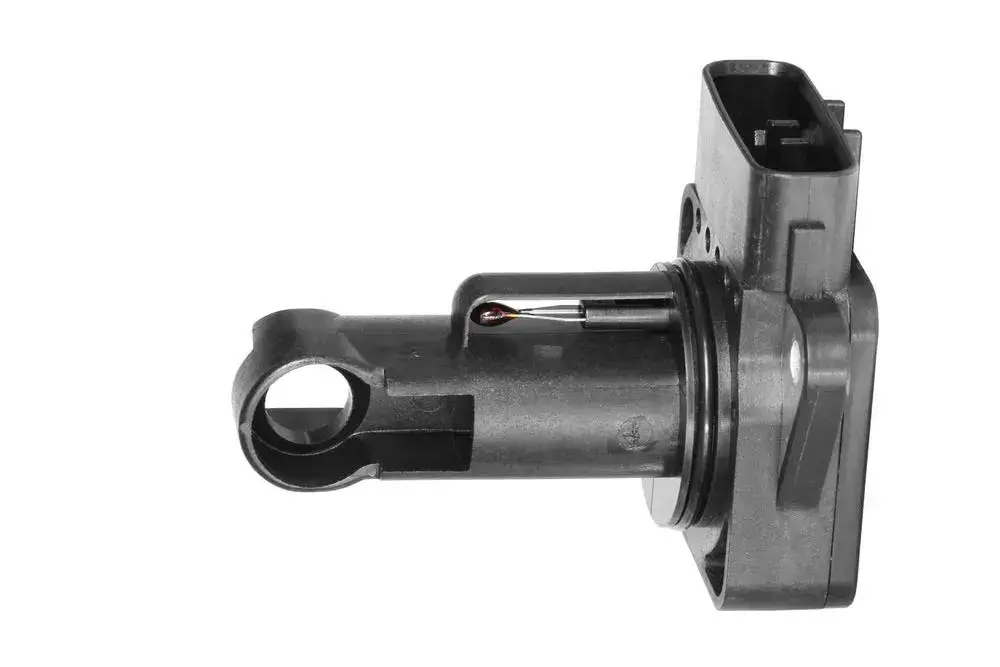
The Mass Airflow (MAF) sensor measures the amount of air entering the engine through the air intake system. With the help of this sensor, the ECM calculates the correct amount of fuel needed to maintain the correct air/fuel ratio.
A dirty MAF sensor will likely malfunction and trigger the codes. It may also cause your Ford truck to start and then die immediately.
Symptoms:
- Check Engine Light
- Engine misfires
- Rough idling
- Stalling
- Reduced power and acceleration
- Hesitation during acceleration
- Poor fuel efficiency
Diagnosis:
- Locate the MAF sensor, which is usually placed in the air filter housing.
- Pop the clamp that holds the air filter housing in its place. Pull out the air filter cover and the air filter.
- Simply pull the mounting plate out and disconnect the wiring harness to take it out.
- The tube that contains the sensor is screwed to this mounting plate with 4 screws. Take the screws out to detach the sensor from the mounting plate.
- The sensor is screwed to the tube by two T20H screws. Take the sensor out by removing the screws.
Now that you have removed the sensor, check it for debris or damage.
Solution:
You can use a MAF sensor cleaner to clean it. Spray the sensor with the cleaner and wipe the dirt off with a clean cloth.
Or, if you would like to replace the sensor, here is a video guide for that-
Reason Three: Vacuum Leaks
If the air intake manifold has a leak, the air/fuel ratio will mess up, causing the codes to appear.
Symptoms:
- Check Engine Light
- Rough idling
- Stalling
- Hesitation or stumbling during acceleration
- Decreased power or performance
- Increased fuel consumption
- The vacuum gauge reading is low or fluctuating
- Sounds coming from under the hood, such as whistling or hissing
Diagnosis:
- Identify all vacuum lines, tubes, and components.
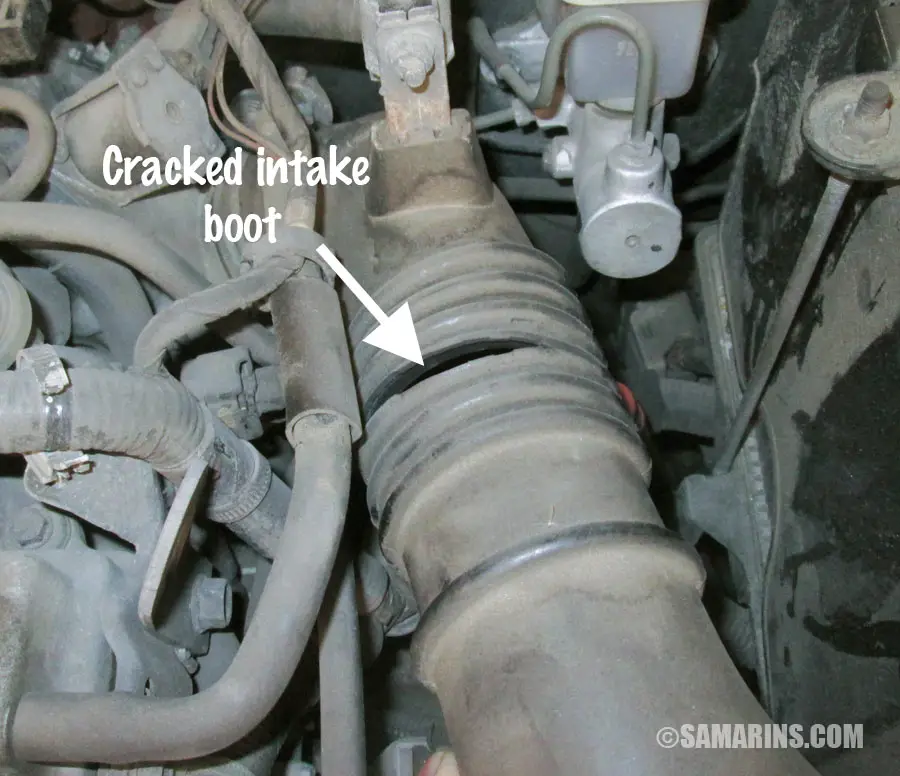
- Visually inspect all the lines and connections to see if there are any obvious issues. Check for disconnected or cracked lines, broken connections, or other damage.
- You can sometimes detect vacuum leaks in complex circuits or systems that are hard to reach with a vacuum tester. Observe its reading after hooking it up to the vacuum lines and pumping it up. When it holds a vacuum, you can eliminate it from your list of possible suspects and continue testing the others on your list.
- Especially, check the intake manifold for vacuum leaks. Inspect the throttle body or carb for any cracks or damage. Also, check any vacuum sensors on the manifold to ensure they aren’t damaged.
- Spray water over a suspected vacuum leak with the engine at idle, and you will hear it get sucked into the engine. When vacuum leaks are large and hard to see, such as cracks in lines, it can be effective.
- You can use a propane torch to detect manifold and vacuum leaks. Open the valve of the torch without igniting it and run the tip along the vacuum and gasket locations. Listen to the engine idle as you do this. If there is a leak, propane gas will enter the combustion chamber, increasing the engine’s RPM for a short period of time.
- Identify where the gaskets are and spray some carb cleaner while listening to engine speed. As the carb cleaner stream is not as controlled as propane, you should be careful if you perform this test. You run the risk of accidentally igniting the cleaner if you spray it on a hot surface.
Solution:
Whenever you find damaged components in your Ford F150’s vacuum system, such as hoses, gaskets, or seals, replace them immediately to prevent further damage. Here is a video guide to help you do the job yourself.
If you notice a hole or crack in a hose, you can try using a vacuum hose repair kit that contains patches and adhesives to seal the leak.
If the problem is with the intake manifold gasket, it is best to seek professional help, as removing the intake manifold and replacing it is complex and requires special tools.
Reason Four: Clogged EGR Valve
The EGR valve recycles the exhaust into the air intake manifold and it is susceptible to clogging. A clogged EGR valve will cause problems with the air/fuel mixture. As a result, the codes P1131 and P1151 will appear.
Symptoms:
- Check Engine Light
- Rough idle
- Engine hesitation or stumbling
- Decreased fuel efficiency
- Increased emissions
Diagnosis:
- Ensure that your Ford F150 is parked on a level surface and set to “Park.” Allow the vehicle to cool for about 30 minutes.
- Locate the EGR valve under the hood of the F150, on the engine intake manifold. It is a small, circular metal component.
- Using a socket wrench, loosen the bolts securing the valve. Remove all bolts and place them to the side once they are loose enough to remove. Disconnect the valve from the manifold. There may be some force required due to the buildup of carbon.
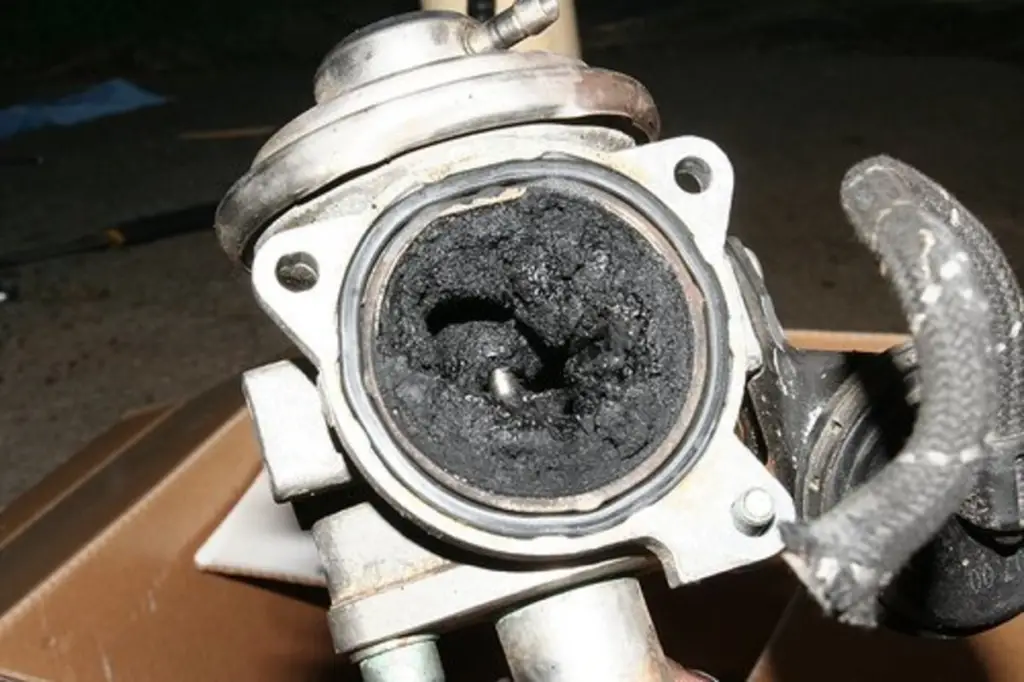
- Now that you have removed the EGR valve, look for soot buildup.
Solution:
You will need to clean the EGT valve if it’s clogged. Clean the inside and outside of the valve using a carburetor cleaner. Use a wire brush and rag to remove any carbon buildup.
Wipe the valve mount with a rag after spraying cleaner on it.
Reason Five: Faulty IAT Sensor
The IAT sensor is used to measure the temperature of the air entering the engine’s intake manifold. The engine control module (ECM) uses this information to optimize air/fuel mixture, ignition timing, and other engine parameters.
A fault in the IAT sensor will disrupt the air-to-fuel ratio, causing the code to show up.
Symptoms:
- Check Engine Light
- Rough idling or stalling
- Decreased fuel efficiency
- Engine hesitation or surging
- Black smoke from the exhaust
- Engine knocking or pinging
- Difficulty starting the engine
- Poor engine performance and acceleration
Diagnosis:
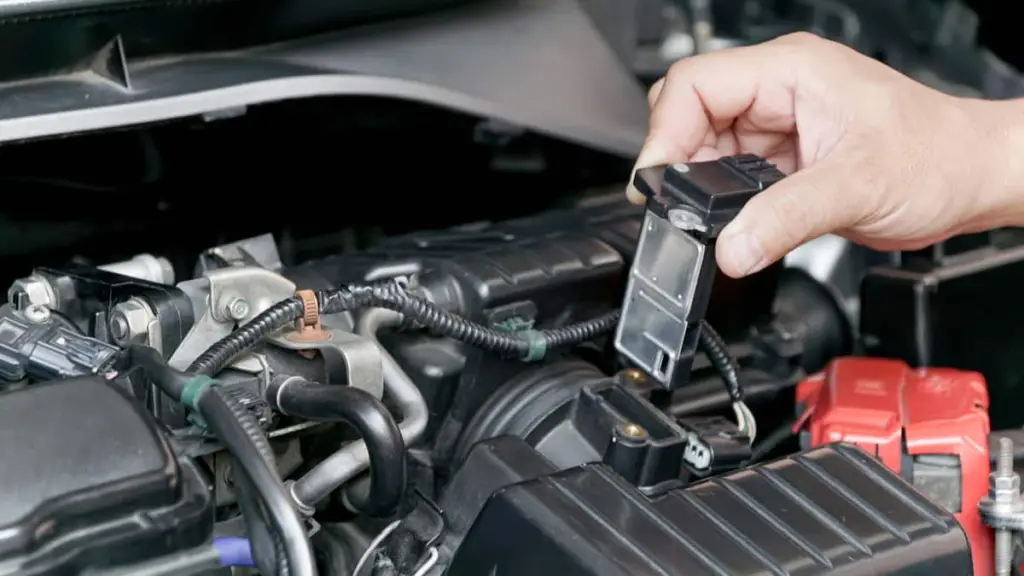
- Locate the IAT sensor. On a Ford F150, it is typically located on the inlet to the air filter housing.
- Check the wiring. The grey wire with no stripe is for the IAT sensor reading and the grey/red wire is for the ground. Make sure to double-check the wire connections before performing the tests.
- Make sure the engine is off and set the multimeter to 200K ohms or higher.
- Probe the solid gray wire for resistance by grounding your multimeter’s negative probe in the battery. Note the reading.
- Start the engine and let it warm up for several minutes.
- Turn off the engine and repeat the multimeter test in the exact same way. Note the reading again.
- Compare the two readings. The first reading should have a higher resistance in ohms since the resistance is greater when the air temperature is low. The second reading should be lower since the air temperature is high.
Solution:
If the second reading is higher than the first, it is more than likely a faulty IAT sensor. In that case, you will have to replace it with a new one. Here is how you can do it-
You can also get it done by an expert, it will cost you around $53 to buy a new IAT sensor and the replacement cost will be $119-$137 including labor charge.
Reason Six: Faulty Spark Plug
Spark plugs ignite the fuel and air mixture inside the combustion chamber of the engine with an electric spark. A weak spark can result in an unburned air-fuel mixture, causing the error codes.
Symptoms:
- Check Engine Light flashing
- Engine misfires or runs poorly.
- Difficulty starting the engine.
- Decreased fuel economy.
- Rough idling or stalling.
- Engine surging.
- Reduced acceleration.
- Increased emissions.
Diagnosis:
The check engine light will flash and stop to indicate an issue with the engine. To visually examine a spark plug for any signs of damage or corrosion, it is necessary to detach it from the engine.
The spark plug wires connect the spark plug to the ignition system located in the cylinder head. Upon removing the spark plug, thoroughly examine it for any indications of corrosion or visible harm.
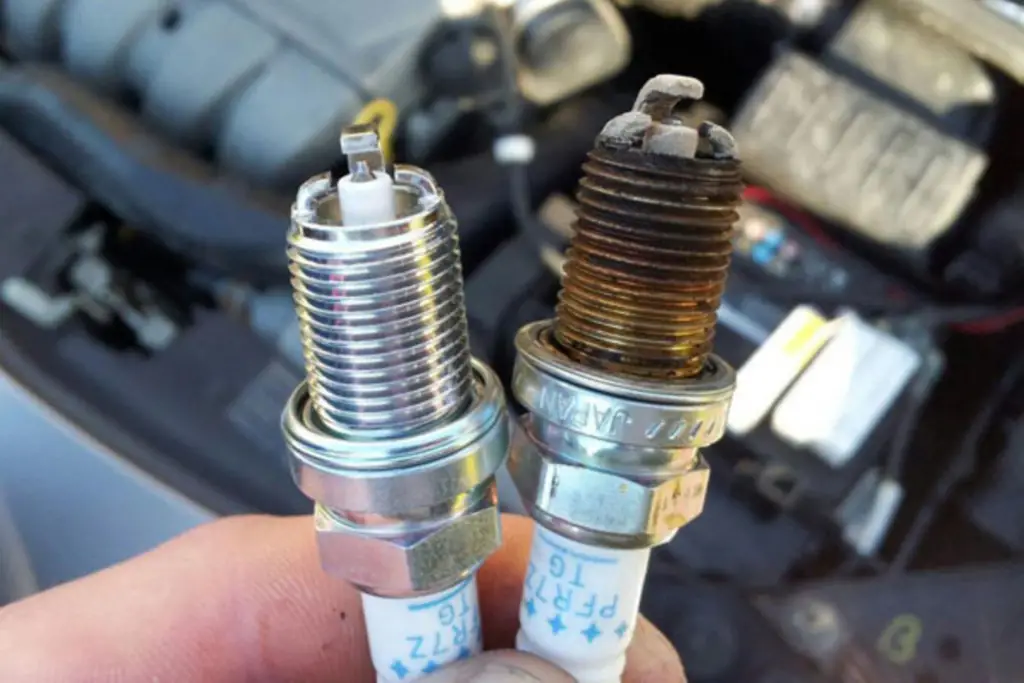
If the spark plug appears to be in good condition, you can test its resistance using a multimeter. To test the resistance, select the ohm reading on the multimeter and adjust the range to 20k ohms. Touch both probes to each end of the spark plug. The spark should exhibit some level of resistance.
If the spark plug shows no resistance, it is most likely defective.
Solution:
You can clean corroded spark plugs using a corrosion cleaner. However, it will be better to replace faulty spark plugs rather than attempt to repair them. It will cost you around $170 on average.
Reason Seven: Faulty Fuel Injector or Clogged Fuel Filter
When a fuel injector or fuel filter is clogged, the engine will not receive enough fuel, making the air/fuel mixture lean.
Symptoms:
- Check engine light.
- Poor acceleration or hesitation when stepping on the gas pedal.
- Difficulty starting the engine or frequent stalling.
- Engine misfires or rough idling.
- Reduced fuel efficiency and increased fuel consumption.
- A strong smell of gasoline when driving or idling.
- Engine hesitation or surging during acceleration or at high speeds.
- Reduced engine power or performance.
- Engine making clunking sounds.
Diagnosis:
If you suspect that you have a clogged fuel injector, there are a few steps you can take to diagnose and replace it.
Before removing the fuel injectors, make sure you do the following:
- Battery negative terminal should be disconnected,
- Remove the fuse from the fuel pump, and
- There are no fuel lines connected.
Then, unscrew the fuel rail and remove each fuel injector one at a time. After taking them out, use a multimeter to test their resistance.
Touch the probes of the multimeter to the injector pins and set the multimeter to measure resistance. Each injector should have about 20 ohms of resistance, give or take. If any injector has much more or much less resistance, it is likely faulty.
Also, check the injectors for clogging.
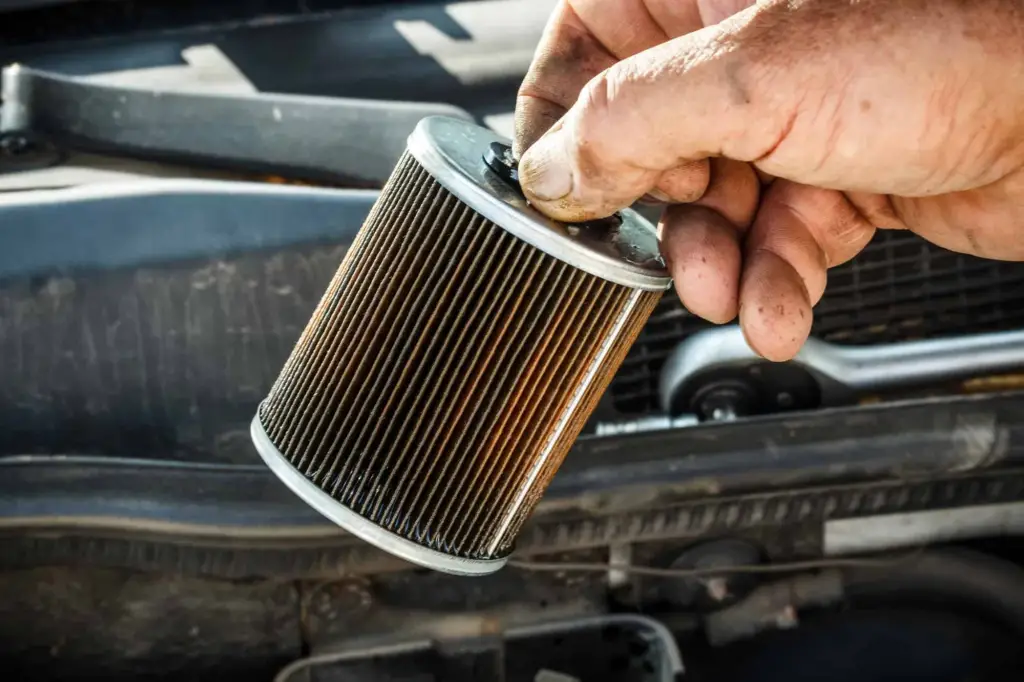
Similarly, if you suspect a clogged fuel filter, locate the fuel filter along the fuel lines. The filter should then be removed from its mount after you have disconnected the fuel lines. Check if the filter is clogged or dirty.
Solution:
If the injectors are bad, they cannot be repaired and must be replaced. Prices for fuel injectors range from $60 to $500, depending on the quality and truck model. Labor charge can cost up to $250.
But clogged fuel injectors can be cleaned with fuel injector cleaner.
Cleaning a fuel filter is difficult and not very effective, so it’s best to replace it. You can save 50-60 dollars on labor costs if you replace your fuel filter yourself. A new fuel filter may cost you between $10 and $20.
How to Prevent Code P1131 and P1151 on Ford F150
The codes P1131 and P1151 on a Ford F150 indicate an oxygen sensor issue, which can lead to poor engine performance and fuel efficiency problems. Here are some steps you can take to prevent these codes from appearing:
- Regular Maintenance: One of the most important things you can do to prevent these codes from appearing is to keep up with regular maintenance on your Ford F150. This includes changing the oil and air filter at regular intervals, as well as checking the fuel and ignition systems.
- Use High-Quality Fuel: Using high-quality fuel that is free from contaminants can help prevent clogging of the oxygen sensors, which can cause the codes to appear.
- Avoid Idling: Avoid idling for long periods of time, as this can cause the oxygen sensors to overheat and fail prematurely.
Conclusion
Ford F150 code P1131 and P1151 could be tricky to diagnose and solve as combinations of different components can trigger them. If the processes confuse you, make sure you contact a professional for help.
Also, do make sure to address issues as soon as possible. Delaying will only increase the severity of the issue.

![Do Motorcraft Spark Plugs Need Anti Seize [Essential Facts to Know]](https://truckguidepro.com/wp-content/uploads/2023/02/do-motorcraft-spark-plugs-need-anti-seize.webp)
