
Why Is The Ford F150 Clunking Noise?
Clunking or knocking noises while driving can be a frightening matter for any driver. It might come from the front end, the rear, or while driving over bumps.
But why are you hearing Ford F150 clunking noise?
Clunking sounds coming from the Ford F-150 when turning are caused by worn-out or damaged suspension parts like ball joints. While accelerating, damaged engine mounts can make a clunking noise, just like loose shock absorbers do when going over bumps. Apart from filling the low steering fluid tank, replacing these items is always the best solution.
For more details on these specific parts and their fixing method continue reading the article below.
Why is the Ford F150 Making Clunking Noise?
Clunking noises coming from a Ford F-150 could indicate a number of potential problems. However, they are all typically connected by a failed suspension part.
It is necessary to address these issues as soon as you suspect faulty suspension components. The problem may become more challenging and dangerous if the failed part is not fixed.
Situation-1: Ford F-150 Clunking Noise from Front End While Turning
Ford F-150 clunking noise from the front end is usually caused by worn-out ball joints or cv joints. But bad or damaged tie rods can cause clunking noise as well along with damaged wheel bearings and low-power steering fluid.
Reason 1: Worn Out Tie Rods
If you are hearing a clunking noise while turning your truck, it is primarily because of a bad or worn-out tie rod. Tie rods help in steering your vehicle by connecting the steering gear with knuckles.
With worn-out tie rods, it’s hard to even turn the wheel. Hence turning the vehicle results in clunking noise.
Solution:
You may need to replace the worn-out tie rod. There are two tie rods that you may need to replace, outer and inner tie rods. Outer tie rods are easier to replace than inner ones, but you need to be careful of the alignment specifications.
For replacing the outer rod follow these procedures-
- First, you need to remove the tie rod’s stud nut.
- Next loosen the jam nut as well.
- And then, remove the tie rod from its place.
- After that, the sleeve nut needs to be adjusted. Now, you can install the new tie rod and replace the nuts back in.
This process requires proper technical knowledge so it’s best to get a mechanic to fix the issue for you. It will cost you around $170-200 to get the tie rods changed within an hour. This includes the parts along with the labor cost.
Reason 2: Worn-out or Damaged CV Joints
Worn or damaged CV joints can also cause a clunking noise when turning the vehicle. The CV (constant velocity) joints are located on the front axle shafts.
These joints are responsible for transferring power from the transmission to the wheels. At the same time, it allows the suspension to move up and down.
Solution:
The most effective way to fix a worn-out CV joint is to replace it entirely. But it is a challenging job so it’s best to leave it to the professionals. It will cost you around $650 to $710 with labor costs.
But if you do want to do this on your own then you need to remove the driveshaft from the vehicle first. Then remove the old CV joint, and install a new one. You will find new CV joints around $95-$100.
However, you may need to replace the CV boot also, which is a rubber cover that protects the joint and holds in grease. Once you install these two parts, reassemble the driveshaft and test the vehicle.
Reason 3: Worn-Out Or Damaged Wheel Bearings
If the wheel bearings are worn or damaged, they can cause a clunking noise too. Because the wheel bearings help the wheels spin smoothly by supporting the weight of the vehicle.
As a wheel bearing wears down, it can cause the wheel hub and axle to move, resulting in a clunking or knocking noise. Driving over uneven areas or while turning will make the noise more audible.
Solution:
You can get the wheel bearing replaced by the mechanic and it will cost you around $350 along with labor costs.
You can replace it yourself as well. But make sure you know exactly what you are supposed to remove and replace in the process. Follow the procedure down below carefully-
- First, use a jack to lift your car off the ground first and support it with a jack stand.
- Next, you will need to remove the wheel by removing the lug nuts. After that, move on to the brake caliper and remove it along with the rotor. Depending on the make and model of your vehicle, you may need to remove the brake caliper and rotor as a unit or separately.
- The wheel bearing will be accessible after you’ve removed the bolts or the retaining clips that hold the wheel hub.
- Now, replace the old wheel bearing with a new one using the bearing installed or press. Remember you need to replace the metal ring or race surrounding the wheel bearing as well.
- Now, reassemble the wheel hub, rotor, and brake caliper in reverse order and reinstall the wheel as well. Lower the jack stand and test the vehicle to see if the clunking noise is gone or not.
If there is a problem with the wheels, you may receive a check brake system message as well.
Reason 4: Low-Power Steering Fluid
Sometimes when the steering fluid is really low or lower than the recommended level it can create a clunking noise as well.
Solution:
You will have to check the fluid level and top up the power steering fluid. Remember to use high-quality steering fluid to ensure no contamination.
Situation-2: Ford F-150 Clunking Noise From Rear End
Clunking noise from the rear end is caused by loose U-bolts, bad drive shaft U-joint, faulty LSD, and bad leaf spring isolator pads. Let’s take a closer look at these reasons-
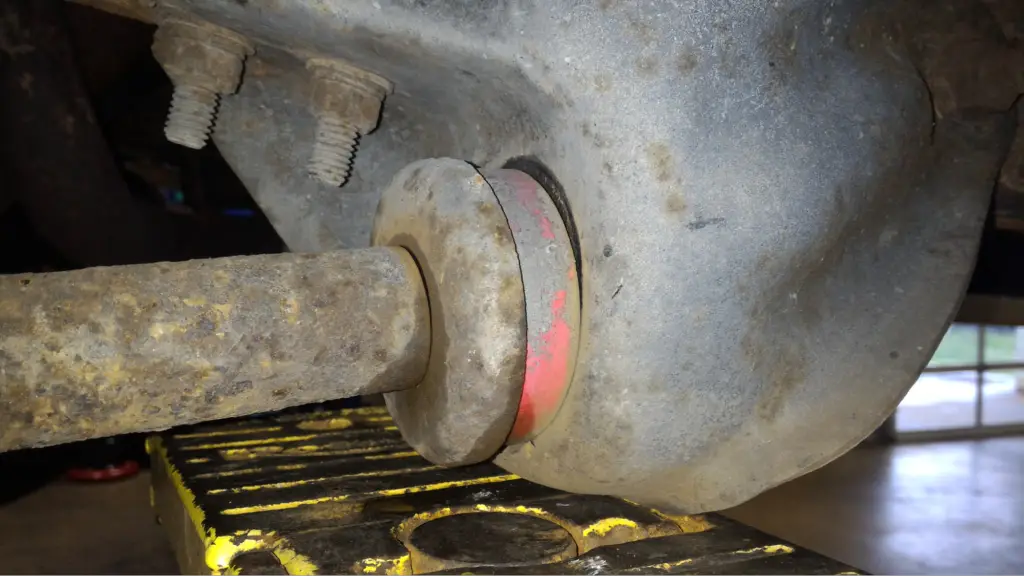
Reason 1: Bad Leaf Spring Isolator Pads
The leaf spring is to blame for the clunking sound if your car just has one drive shaft and no slip-yoke joint. This is a common problem with older trucks.
In order to prevent direct metal-to-metal contact between the master leaf spring and the leaf directly beneath it, spring isolator pads or bushings are positioned between them.
But, after a while, this plastic piece or the bushings wear down and make a loud clunking noise from the back. The pads also wear down after a while and fail to keep metal-to-metal contact from happening.
Solution:
Just replacing the leaf spring and shackles won’t solve the issue, you need to change the isolator pads as well. You can buy these parts in auto shops.
On the other hand, lubricating leaf springs can also solve this issue.
- First, remove the bottom shock bolt from the housing, allowing the shock bolt to hang supporting the axle tube. The axle can now be removed from the spring seat by removing the U bolts and nuts.
- Clean the area around the mounting point on top and bottom, as well as the area beneath the leaf spring. Use either Ford-specific grease or WD40 grease spray next to the mating surfaces of the rear spring mounting plate and rear spring.
- Use Ford grease and detach the rear axle from the spring seat in a similar manner to avoid having metal-on-metal contact. Make sure to grease the leaf spring bushings at the shackle joints.
If you are not able to lubricate the leaf springs then as a temporary solution, you can spray the liquid wrench on the spring leaves around bolting arrangements. It would offer a fluid coating on the leaf spring and stop metal-on-metal contact and stop the clank.
Reason 2: Bad Driveshaft U-joint
A loose or a bad U-joint can also be behind the clunking noise of the Ford F-150. Unstable driveshafts make it difficult for the transfer case to adequately handle and transmit high torque to the rear subframe.
And as a result, there is a rear-end clunk during takeoff, particularly when driving upward. Moreover, a small amount of motion in the U-joints would cause vibration and clunk while driving.
Solution:
It is crucial to check for wear and replace the damaged U-joints. Although trying to replace a driveshaft U-joint can be difficult, it is doable with the correct equipment and skills.
But before disassembling them, label them to make sure you assemble the correct parts of the driveshaft. Any shift in orientation could cause the driving shaft to become completely unbalanced. Follow the instruction below carefully-
- First, jack up your car to make sure the car is secure and supported. Now take the driveshaft out of the car. Put the driveshaft in a vice or other appropriate holding fixture.
- After that, take the retaining clips of the U-joint off. These clips secure the caps and keep them from slipping off the U-joint yoke.
- The U-joint caps should now be pushed out using a hydraulic or U-joint press tool. You can also use a socket or a heavy hammer for this.
- Now, replace the driveshaft yoke’s old U-joint with the new one. Ensure that the yoke and the U-joint caps are properly aligned.
- Now retract back the aforementioned steps and reinsert the driveshaft. You must test the driveshaft to confirm it’s functioning properly.
Remember to stick to manufacturers’ guidelines for torque specs and processes. To avoid any potential complications in the future, replace both U-joints at the same time.
Reason 3: Faulty LSD
The LSD makes a heavy clunking noise when the clutch packs are damaged in a Ford F-150. The Limited-Slip Differential, or LSD, ensures that the car rolls out of situations when one wheel has little traction and the other has high traction. But LSD fails to do so when the clutch packs get damaged resulting in heavy clunk.
You can check whether the LSD is the main culprit by turning the LSD ON/OFF. If the clanking problem goes away, the LSD was the cause of the clank.
An exhausted timing chain can create differential problems, so you may also hear clicking noise in your F150.
Solution:
More friction modifiers need to be added to your differential oil. For LSD, gear oil typically needs to have a 5 to 6 ounce of friction modifier. When making a turn, the friction modifier ensures that there is only a minimal slide at the point where the clutch packs meet the friction discs.
It can help to decrease the clunking sounds produced by the rear-end differential. You might need to have a professional mechanic replace the clutch pack if it doesn’t fix the issue.
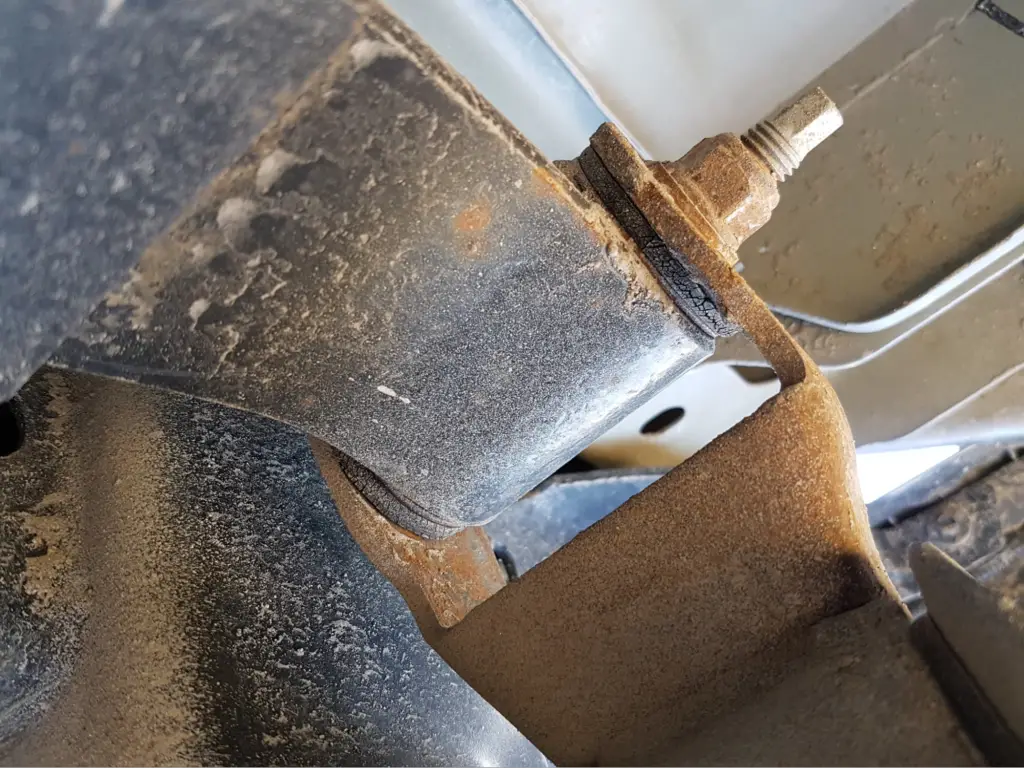
Reason 4: Loose U-bolts
The Ford F-150’s rear-end clunk can also be brought on by the movement of the U-bolts and nuts. These hold the rear leaf spring and become loose over time from vibrations unless they are tightened to the required torque.
Solution:
You need to tighten these U bolts and nuts. Follow the steps below one by one to tighten the nut-
- Get a socket or wrench that matches the nut and bolt’s size. Before tightening it, use it to secure the U-bolt in close proximity to the surface it is trying to clamp down on.
- Start tightening the nuts now in a crisscross manner. Torque wrenches are highly recommended to ensure the nuts are adjusted to the correct torque. Check the manufacturer’s specification for proper torque of the U-bolt and nut size.
Situation-3: Ford F-150 Clunking Noise While Accelerating
A damaged drive shaft component, such as a U-joint or CV joint, is most likely the cause of the clunk when you hit the pedal or change gears.
Along with these damaged components, the engine mount might create clunking sounds when shifting into reverse or forward. Let’s have a look at the issue and see how you can solve the engine mount problem.
Worn or Damaged Engine Mounts:
With time, the engine mounts that keep the engine in place usually wear out. So, when accelerating or decelerating, these worn-out or damaged sets of mounts cause the machine to wobble and make a loud clunking sound.
Solution:
Go through the steps one by one to fix the issue-
- First do a visual inspection of the engine mount to see if there are any signs of wear, damage, or excessive movement. If there is visible damage then you need to replace these mounts with new ones.
- Use a jack to lift the truck, making sure it is securely supported on jack stands.
- Now with a wrench remove the bolts and nuts holding the old engine mount in place. Clean the mounting surface with a wire brush or scraper and install the new engine mount.
- After that remove the jack stands and lower the truck to the ground. Now start the engine and check for any vibrations or misalignment. If necessary, adjust the engine mount position and tighten the bolts.
- Take the truck for a test drive to ensure the engine mount is securely in place and functioning properly.
Situation-4: Ford F-150 Clunking Noise While Going Over Bumps
While going over bumps clunking noise can be caused by worn-out or damaged suspension components like ball joints, tie rods, and sway bar links along with worn-out shock absorbers.
The worn-out suspension components need to be replaced in the process we mentioned above. Let’s see what happens in the case of shock absorbers-
Loose or Worn-out Shock Absorbers:
The worn-out shock absorbers may not be able to adequately absorb vibrations and bumps, which results in a clunking sound while going over bumps.
They are employed in automobiles to absorb the energy produced by the motion of the suspension system. A vehicle’s suspension system compresses and rebounds as it travels over bumps. To maintain a smooth ride and avoid harm to the vehicle, this energy must be absorbed.
Solution:
After doing a visual inspection you can decide whether the shock absorbers need to be repaired or replaced. Completely worn-out shock absorbers need to be replaced by new ones.
But if the shock absorbers are in good shape but loose then use a wrench to tighten them and check whether the clunk goes away when you start the engine.
Frequently Asked Questions (FAQs):
What is A Transmission Clunk?
You will hear a clunking sound coming from your automatic transmission if the fluid is low or too old. This is due to insufficient cooling and lubrication for the individual gearbox components. At the same time, it can indicate a problem with your transmission just as well.
What are the Signs of A Failing CV Axle?
Clicking noises, difficulty driving, and damaged boots are the most prominent signs of failing CV axles or half shafts. The damaged CV axle frequently makes a clicking or clunking noise as you turn the car.
Can I Drive My Car With A Damaged CV Axle?
No, do not drive your car if one of the axles is broken. It is not safe at all. It’s only a matter of time before your axle completely breaks if you hear a thumping or clunking sound when making turns.
End Words
That was the end of our discussion on the Ford F-150 clunking noise. Hopefully, the particular reason behind your Ford making clunking noise has been detected.
Now if you are not confident enough to fix the issue yourself don’t hesitate to take it to a mechanic. It will only cost you around $100 dollars now but if you drive your truck without addressing the clunking issue it will cause your vehicle further damage.
Until next time, Stay safe on the road!
![How To Bleed Clutch On A Ford Ranger? [Easy Steps]](https://truckguidepro.com/wp-content/uploads/2021/08/How-To-Bleed-Clutch-On-A-Ford-Ranger-768x480.jpg)


![Ford Pre Collision Assist Not Available Sensor Blocked [Fixed!]](https://truckguidepro.com/wp-content/uploads/2023/01/ford-pre-collision-assist-not-available-sensor-blocked.webp)